Well I hope you all had a happy christmas..I did! all my family came down for christmas day,. and they were all suitably impressed with the creations I did for them. My daughter loved her frame, but my eldest son was the one that surprised me the most as he was in tears when he opened his frame and shouted I LOVE IT!! so I think I did ok there then.....
On Boxing day it was my daughters birthday and so everyone came back for a birthday party for her!! so 2 days of a full house, which will mean I will feel the emptiness now they have all gone to their own homes. My grandaughter was here and she was the star of the show but she had a cold and had red eyes and white cheeks, and at just 12 weeks old I think christmas wore her out!!!]
My craft room has been out of limits over christmas and tomorrow I have housework to do but Im hoping to get that done in the morning and play with my new presents in the afternoon...
2nd of January sees me start my hospital treatment, I have to go 3 times a week for the next 6 weeks as a starter and we will see how things are then as to when I will have to go again and for how long....
So if you dont see me around then its because Im at the hospital having my treatment like a good little girl!!
Have a fabulous New Year
Love debby xx
Wednesday 26 December 2012
Monday 17 December 2012
Frame for Nicky

I typed the words then scrolled thrugh my fonts to find one I liked and chose a typewriter font and scripta. I chose the typeface because I wanted people to be able to read the words without difficultly because I didnt want the emotion of the words lost. I high lighted in script the few words I did to just make them jump out at you.
Thank you for looking
Love debby xx
Frame for Michael
My oldest son recently became a father for the second time! and although he is a doting daddy he says his life is just work work work now as he has 2 children to provide for!! (I had 4 so I know how hard it can be bringing up children!!) I saw these words in the silhouette store (in the sale I might add!!) and immediately my sons words came back to me, so I just had to make this for him...
 I managed to buy an A4 frame from the pound shop!! and cut the black and red words out.,, then I made a mistake by not having my grid under the glass to place the wording!! a mistake I hopefully will never make again! Although it looks reasonably straight for some reason it wasnt centered right and I had a huge gap at the bottom....after looking at it for a day or two I decided it definately needed something to fill the gap...I found a flourish in my silhouette library and duplicated it rotated horizontically and vertically then welded the 2 flourished together and ended up with this lovely symetrical flourish!!
I am hoping to get away with this!!!
Thank you for looking
Love debby xx

I am hoping to get away with this!!!
Thank you for looking
Love debby xx
3D ornament
For the 12 days of christmas the silhouette store is giving away free files, and one of the files they have kindly given us is this 3d ornament. Well I just had to try it didnt I??
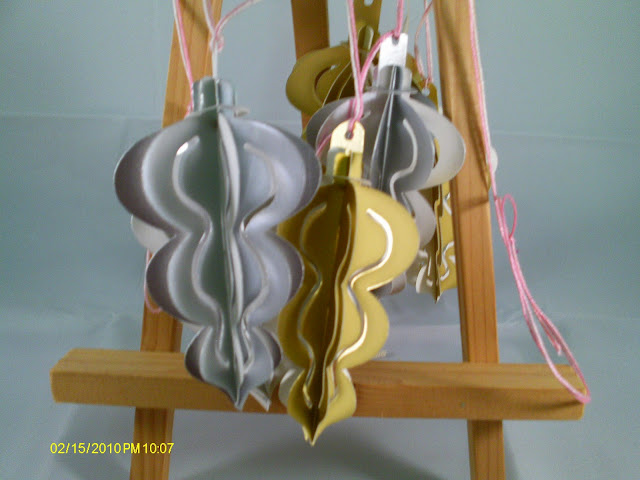
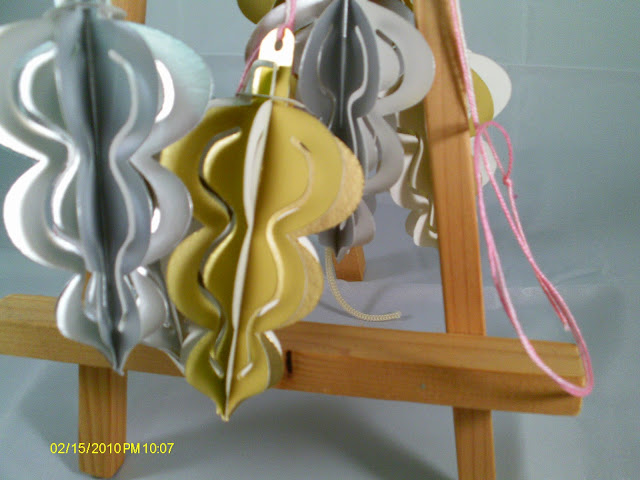
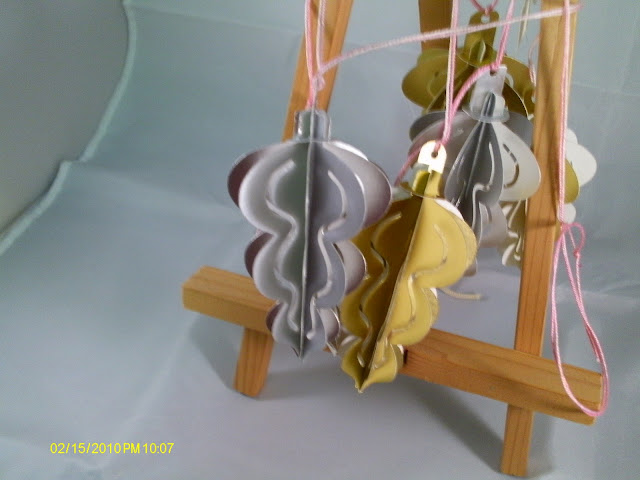 I used a metalic gold and silver card 160gsm. I didnt have too much trouble putting them together because the construction was very like the ghost and spider 3ds I did for halloween. I managed to cut and put together 6 of them in less than half an hour. I threaded them onto some string that has been sitting waiting patiently on my desk to be used and will put them along the mantlepeice.
All in all a quick but pretty project. If you have not done these type of files before then it can be a little challenging at first but you will soon manage to turn them out at a rate of knots ,.. the secret is not to use to heavy a weight of card!!
Thank You for looking
Love debby xx


All in all a quick but pretty project. If you have not done these type of files before then it can be a little challenging at first but you will soon manage to turn them out at a rate of knots ,.. the secret is not to use to heavy a weight of card!!
Thank You for looking
Love debby xx
Shadow box
I bought a few shadow boxes from the silhouette store when they were first posted but never really got around to using them....as a crafter YOU know exactly what I mean when I say I needed them' but didnt know why just that they would come in handy one day. Lol.
Well...I found a very good use for them,. and its all to do with my daughter,.again! She can be a cheeky little madam at times and said to me 'Im expecting a fabulous card from you for christmas Mum, and NOT the common all garden one that you are giving the neighbours. I want a special one off for me' as I said she can be cheeky!! But she got me thinking.....and as its her 30th birthday on Boxing Day I wanted to make something a little out of the ordinary for her.....Thats where the 5x7 shadow box from Lori Whitlock came in...
Heres her Birthday card.........


 I used a green A3 card 230gsm to make the frame. I laid a mat of green squared card from Payperbox
for the background. I found the handbags in my stash and the paper flowers were from Hobbycraft. The leaves were from the silhouette store and I have used them so many times that I have a box full waiting to be used!! The mirror shape and photo were done in craft artist 2. The decorative tape around the box was from Hobbycraft and its their cheaper version of Washi Tape that costs about half the price of the real thing but I got this one in the sale for 99p!!
Then I decided I liked this so much that I thought I would also make her one for christmas....


 The papers and flowers were from the same source as the birthday card except the red roses, they were from the ones left over after making my latest wreath!!
The stamp was a digi stamp I downloaded from the internet and coloured using my promarkers.
I just hope she thinks they are special !!
Thank you for looking
Love debby xx
Well...I found a very good use for them,. and its all to do with my daughter,.again! She can be a cheeky little madam at times and said to me 'Im expecting a fabulous card from you for christmas Mum, and NOT the common all garden one that you are giving the neighbours. I want a special one off for me' as I said she can be cheeky!! But she got me thinking.....and as its her 30th birthday on Boxing Day I wanted to make something a little out of the ordinary for her.....Thats where the 5x7 shadow box from Lori Whitlock came in...
Heres her Birthday card.........


for the background. I found the handbags in my stash and the paper flowers were from Hobbycraft. The leaves were from the silhouette store and I have used them so many times that I have a box full waiting to be used!! The mirror shape and photo were done in craft artist 2. The decorative tape around the box was from Hobbycraft and its their cheaper version of Washi Tape that costs about half the price of the real thing but I got this one in the sale for 99p!!
Then I decided I liked this so much that I thought I would also make her one for christmas....


The stamp was a digi stamp I downloaded from the internet and coloured using my promarkers.
I just hope she thinks they are special !!
Thank you for looking
Love debby xx
Friday 14 December 2012
a winter card
I belong to several pages on facebook for cameo owners and one of the pages is UK silhouette cutters group. The lady that runs the page loves Beacons 3 in 1 glue...something I have yet to try. So for a special little thing to do for christmas she contacted Mark the main distributor of beacons glues for the uk and asked him for some for a competition prize and he came up trumps!! 4 winners will each win a box full of beacons glue!! but the comp was only open to uk residents...
I have made an entry for the competition the rules were as follows..
1. Create a card with a winter theme (not Xmas) – any size and style design using your cutter.
2. If you can, please use Beacons 3-in-1 glue
3. Send photo(s) of your card to me in a private message
...


I have made an entry for the competition the rules were as follows..
1. Create a card with a winter theme (not Xmas) – any size and style design using your cutter.
2. If you can, please use Beacons 3-in-1 glue
3. Send photo(s) of your card to me in a private message
...
4. Cards must not have been entered in any other competition previously.
5. One entry each
6. Winners will be picked by an independent person. Once the winners are picked they will be notified and they MUST send their entry to me for forwarding to Mark Wilson to claim the prize which Mark will send directly to the winners. Cards will not be returned and winners must agree to their entry being displayed at trade and retail shows.
7. Closing date for entries is 12th December 2012, winners will be announced first week of January 2013
Here is my entry..

I used a digi stamp that I downloaded from the internet...and used my promarkers mainly cornflower blue and cool grey2.
I cut the frames on cammie and used digi paper that I had from a cd that came from a magazine!!
I used my cuttlebug on one of the layers and used the doty folder.
To embellish the card I used a cameo file from the shop for the 3d pointed flower and used a blingy brad to stick it together and mounted it onto the card with a foam pad


Monday 3 December 2012
Sunday 2 December 2012
I am amazed!!!
I am amazed and so happy!! I entered my christmas wreath into a November challenge on facebook on a page called Cindys Handmade cards and crafts and I won!! I know the prize is cardmaking goodies but I am not to worried about that because I am just sooo happy that I won!!!
This is the first time I have ever won anything for my craft and it feels wonderful!! I would like to thank all the ladies on that page, because they have given me such a personal lift and it feels great..........xx
It makes me feel like I have gained recognition for my works and makes me want to start crafting even harder....so Ive been looking at my poor rubber stamps that have been neglected since my cameo came along...and then theres my dies and promarkers.........
Hhhhmmm cant stay chatting on here Im off to craft xx
Thank you for reading this
Love debby xx
Monday 26 November 2012
christmas wreath

To make the wreath firstly I bought a polystyrene ring, this one was 12"

Then I cut out loads of scalloped circles in various co ordinating colours and made into flowers. Here is a tutorial showing you how to do this...
http://www.youtube.com/watch?v=u3DZSEfEYPA
These flowers are so easy to make and the best thing is that you can cut the circles on your cameo and so it takes minutes to have 5 or 6 made!!

I then decide which leaves I want to use because sometimes the colours used in the flowers change the way you want to lay out your wreath....so my leaves always come last to cut but first to go down...

Then comes the fun time...I tend to use my glue gun to stick the leaves and flowers to the polystyrene as that way they are nice and secure and will withstand the tugging and playing with that they are subjected to by my family!!
The reindeer in this one was some cuts I had left from christmas cards I made!!

The Father chrismas and Mother Christmas were my husbands find...he went to a tabletop sasle and a lady there had a carrier bag of craaft bits that she sold to him for £2 and right at the bottom there they were. The minute I saw them I knew they were destined for this years wreath!!

Thank you for looking
Love debby xx
Tuesday 20 November 2012
I went blank....
After completeing the toppers and Angels for my friends church group I decided to start on my christmas wreath and spent a whole day cutting fancy edged circles for the flowers...it is a big polystyrene circle I have to fill...and they have sat on my desk waiting and waiting...in the last week I have managed to just put 12 together...I am ashamed of myself lol :)
I keep looking at the piles of circles and they just sit staring back at me...then today it being tuesday I downloaded the free silhouette store file and its a tree and I looked at it and looked at it and couldnt think how to put it together other than to stick each layer on top of each other and I scratched my head and looked and thought I had lost the ability to craft!! Then they blogged about the shape and I found that my 1 tree was actually 4 trees and it was so easy to do that I shook my head at myself and instantly made one up....so I have mentally given myself a shake and hope that my crafting mojo is returning with a vengeance...Hope to be able to do something this evening to post tomorrow...I think I may start off with something simple like a snowglobe using this weeks file and then work up to my wreath..
Thank you for being here
Love debby xx
Saturday 10 November 2012
Im doing my bit!!
I havent been able to do any crafting for myself for the last week, as my friend approached me and asked would I please cut her some toppers so that she could make some cards for her church to sale in their christmas fayre...she said it wouldnt be too much just a few....well I said I would but that she would have to supply the card....mistake....she turned up with 50 sheets of card so that 'I could cut some toppers for the ladies at church' as Ihad already said I would cut her some I felt obliged....but now I am sick of snow men, nativity scenes and snowflakes... I know this will be a help with the church funds but it isnt something that I would want to do too often as I have found it sapped my mojo knowing that I had to do this instead of being something I wanted to do lol...
So today I have cut the last sheet and am sighing a sign of relief...although I didnt mind doing it I didnt realise how much stress it would cause because when you do something for someone else you always want perfection....I also didnt realise how much it would sap my inspiration., but its done now and I can start my christmas crafting...Im hoping to do a few pressies for the girls first..
Thank you for looking
Love debby xx
Friday 2 November 2012
November Card challenge
The November card challenge for the silhouette plus forum for this month is a simple phrase...A Winters Tale....I was going to write an intro to it but with all the things that phrase bought to mind it would have been a very long intro indeed and had a moment of genius?? and thought i would just write the phrase and see what happened...and of course I had to give some inspiration, because everyone gets blocked now and again and one picture can sometimes give you tons of ideas...
The first card I made for inspiration was taken from a painting by Thomas Kinkade and adapted for card making by Joanna Sheen and put in decoupage form onto a cd. My beautiful Mum bought the cd for me when she saw me umm and aaah-ing at it! So a perfect time to use it..
 The background paper came from the same cd winter by Joanna Sheen. I used foam pads on the decoupage and dare i say it I actually hand cut the layers!! I used white flowersoft on the roof of the house with my tacky glue. I high lighted the roof with a glitter glue as well. I then used a silver ribbon to which I stuck a chain shaped peel off. I used a swirl that I cut with cammie and glued white ribbon roses to it. A very winter looking card!!
The next card I did for inspiration was a white wolf from a crafters companion cd titled traditional christmas. I keep looking at this picture and always thought it would make a lovely christmas card. So finally I made one and I like it though hubby is not sure...

I used a background paper that I had in my stash, but I dont remember where I got it from. The black border with the glittery stars was on the same cd as the wolf as was the other embelishments. In real life you can see a little colour on the front of the wolf and so I glittered the heart a couple of shades from that to help it pop out more. The photo edges were cut with cammie and covered with silver leaf. I deliberately didnt completely cover them as I wanted some of the red to peep out and add colour to an other mono chrome card.
The third card was another Thomas Kinkade painting adapted by Joanna Sheen and on the cd...
 I used the background paper from the CD but alas I stuck it on wrong but with everything covering the card it doesnt really notice!! (I hope!!) Again I hand cut the decoupage and used foam pads to stick it with. I glittered the path infront of the church to accentuate the frost and snow. I added some leaves cut by cammie and some roses made from scalloped circles. I like how this one turned out.
I still had ideas for the inspirations and made this last card which I think can be suitable for children and young female teeens..
 This card was made using the forever friends A winters tale collection...all the papers and decoupage came from that collection the only thing I added was the ribbon with bell and the gems. I thought this design lended itself to an easel card quite well and this is what I had in mind when I saw the collection, although I had originally intended to do the card in the red option when it came to making it I decided I liked the blue better for this particular card.
Thank you for looking
Love debby xx
The first card I made for inspiration was taken from a painting by Thomas Kinkade and adapted for card making by Joanna Sheen and put in decoupage form onto a cd. My beautiful Mum bought the cd for me when she saw me umm and aaah-ing at it! So a perfect time to use it..

The next card I did for inspiration was a white wolf from a crafters companion cd titled traditional christmas. I keep looking at this picture and always thought it would make a lovely christmas card. So finally I made one and I like it though hubby is not sure...

I used a background paper that I had in my stash, but I dont remember where I got it from. The black border with the glittery stars was on the same cd as the wolf as was the other embelishments. In real life you can see a little colour on the front of the wolf and so I glittered the heart a couple of shades from that to help it pop out more. The photo edges were cut with cammie and covered with silver leaf. I deliberately didnt completely cover them as I wanted some of the red to peep out and add colour to an other mono chrome card.
The third card was another Thomas Kinkade painting adapted by Joanna Sheen and on the cd...

I still had ideas for the inspirations and made this last card which I think can be suitable for children and young female teeens..

Thank you for looking
Love debby xx
Monday 22 October 2012
Halloween and christmas files
I couldnt sleep last night so I played with cammie and came up with these files and thought I would share them with anyone that wants them. If you do have them please leave me some love so Iknow wether its the type of thing people would use so next time I have an idea of what you all want...as they are my files I am quite happy for you to use them however you want to just give me some love!!
 Here is the link to the file..
http://www.fileswap.com/dl/KmfSjGrMJy/happy_halloween_by_debby_x.studio.html
and heres the 2nd one a christmas one
 and heres the link for that one
http://www.fileswap.com/dl/k0DLWL79li/christmas_joy_by_debby.studio.html
Have fun and enjoy!! Im off to play xx
Thank you for looking
Love debby xx

http://www.fileswap.com/dl/KmfSjGrMJy/happy_halloween_by_debby_x.studio.html
and heres the 2nd one a christmas one

http://www.fileswap.com/dl/k0DLWL79li/christmas_joy_by_debby.studio.html
Have fun and enjoy!! Im off to play xx
Thank you for looking
Love debby xx
HoHoHo
I thought afterall the halloween things it was time to start on my christmas themed items, and so I bought the H and the O from the silhouette store and happily cut them out!! Yep I was all innocent and keen and came a cropper on the 'O's but I persevered and ended up with something akin to an O.

 The card I used for these were from germany a company called Max Bringmann and they were beautiful, unfortunatley the os let me down. I had no trouble with the Hs they went together like a dream but I just could not get the Os to go together in a reasonable shape and one of them is decidedly oval! I will put them up at christmas but Iwont be trying to make anymore Os for a long time!
Thank you for looking
Love debby xx


Thank you for looking
Love debby xx
Another witch project
When looking through the silhouette store I found this file whilst looking for inspiration and decided that I liked it. I think it ws meant to go onto a wooden plaque but hey I have loads of frames waiting to be used so frame it was...
 I cut this one whilst cutting the previous project so they all fitted onto the same pieces of vinyl. Theres not much to say about this one except of course if you are doing it on a frame then dont for get to reverse the image before cutting so that it goes inside the frame.
It is a cheeky little frame and I love it! and so will my daughter so i think I may loose this one when she sees it!
Thank you for looking
Love debby xx

It is a cheeky little frame and I love it! and so will my daughter so i think I may loose this one when she sees it!
Thank you for looking
Love debby xx
Haunted House picture
I decided it was time to play with my vinyl again and this file from the silhouette store caught my eye...
 This was not as easy as it looks because you had to be quite precise with the layering. I cut it all out then laid the orange circle onto my tranfer sheet,. Onto that i then layered the black house and bats and that was no mean feat i can tell you! I then got my trusty pokey tool to lift the green vinyl and carefully put that in place (amid much cursing and redoing!) I also must say that before cutting I reversed the image because I was putting it onto glass. I then took a deep breathe and flopped it onto the glass and used my scrapper(old credit card) and finally was able to remove the transfer sheet.
I looked on my pc and found a backing paper that was a very pale orange and printed it out as a backing sheet to finish this project off. I cant remember where I got the backing sheet from it was so long ago but I think it must have been from a blog train.
Thank you for looking
Love debby xx

I looked on my pc and found a backing paper that was a very pale orange and printed it out as a backing sheet to finish this project off. I cant remember where I got the backing sheet from it was so long ago but I think it must have been from a blog train.
Thank you for looking
Love debby xx
Potion bottle
Debbie from the silhouette plus forum made up this lovely file and I thought it would be a great addition to my growing halloween collection...You can get the file from here:-http://www.paperpulse.blogspot.co.uk/2012/10/potion-bottle-svg-and-studio-files.html Debbie loves the fact that people all over the world use her files to make up,..if you get the file please leave her some blog love!!
I didnt do any adaptions to this i just made it as is
 but whats all that stuff on it? I hear you ask..Well I did that deliberatly to age the bottle and make it look dusty, I used my cosmic shimmer on it and although in the photo it looks naff it does look better in real terms I think! A nice little bottle and easy to make.
Thank you for looking
Love debby xx
I didnt do any adaptions to this i just made it as is

Thank you for looking
Love debby xx
more Halloween things...
I know I have been missing of late but I have been crafting and have lots to upload today so this is the first of a few posts....
I have spent a week with my Mum and Dad over in the forest...I had a fabulous time..just being able to sit and talk with those closest to you can be soul reviving...
Then I came home and started to put together my plans for halloween decorations and started with this rather sweet treat box from the silhouette store. I decided it would make a nice candle holder, so out came the electronic candles and 6 of these were made..
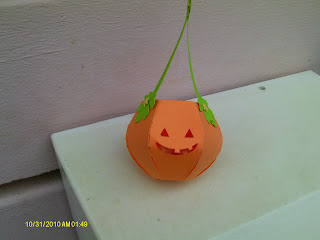 I think their little faces are so cute...and they will be lighting up my path for halloween...
Then I got round to sticking on my labels to the jars and filling them with the bits and pieces i have found in the pound shop...

 I still have the lids to do and havent yet filled them with coloured water, I found black, red and green food colouring in Asda this week at 2 for £1 a great deal. The eyeballs are tabletennis balls, the skulls are from poundland, they were a banner and there were 6 on the banner for a pound! bargain..the dried vampire fangs is fruit tea..you know the sort, when your ill and some kindly soul brings you flavoured tea cause its good for you but when you taste it yuck! well I must have had lots of visitors thinking the same thing because I found 5 opened packs at the back of my cupboard and they were all dated 2008! so waste not want not as granny used to say and voila now its vampire fangs!
Thank you for looking
Love debby xx
I have spent a week with my Mum and Dad over in the forest...I had a fabulous time..just being able to sit and talk with those closest to you can be soul reviving...
Then I came home and started to put together my plans for halloween decorations and started with this rather sweet treat box from the silhouette store. I decided it would make a nice candle holder, so out came the electronic candles and 6 of these were made..

Then I got round to sticking on my labels to the jars and filling them with the bits and pieces i have found in the pound shop...


Thank you for looking
Love debby xx
Tuesday 9 October 2012
A Sketch frame
I found this saying and rather liked it so decided to do a frame with it...then I sat at my pc to actually do it and just felt I couldnt do any more vinyl at the moment....but I wanted this frame...so I decided to use the sketch feature of my cameo and see how it turned out....
I scoured my pc for a backing paper and found this yellow splodgy one that I got from a blog hop moons ago. I then looked at my fonts and decided to use Georgiana snf which I had bought from sil store when I had loads of credit that I had to use up or loose...
I used my sil pen holder and a sakura gel pen in black. This is how it turned out
 It says: there will always be a reason to meet people, either you need them to change your life or you're the one to change theirs....
I framed it with a frame from poundland...
Not sure wether I like the end result or not but I think its growing on me...
Thank you for looking
Love debby xx
I scoured my pc for a backing paper and found this yellow splodgy one that I got from a blog hop moons ago. I then looked at my fonts and decided to use Georgiana snf which I had bought from sil store when I had loads of credit that I had to use up or loose...
I used my sil pen holder and a sakura gel pen in black. This is how it turned out

I framed it with a frame from poundland...
Not sure wether I like the end result or not but I think its growing on me...
Thank you for looking
Love debby xx
3d Halloween boots
Last year there were some lovely examples of 3D witches boots floating around and they were stunning!! But I was still so new to 3d that I didnt try them, but this year they had a file in the silhouette store and I was tempted.......so being the mad woman i am i decided to give it a go...and heres the results

 The main card I used was from a collection from Germany that I bought in my local Lidl store last year...It was an Autumn/Winter pack of the most lovely double sided card...I used one piece for the main parts of the boots and a little black card and off cuts in my stash for the rest....
I had so much trouble trying to stick the boots together that I got quite frustrated,. I dont know wether it was the card or my glue but they just did not want to stick and are being held together by a wing and a prayer...
A fun file but by gosh frustrating to boot...
Thank you for looking
Love debby xx
Monday 8 October 2012
Halloween wreath
Having made the other Halloween items I thought I should need a Halloween wreath to hand on the door....Yep I intend frightening the little mites this year as they all think Im some sweet old Lady that lives in my house wih my hubby and kids...lol
I looked around Pinterest and saw so many lovely ideas...I particularly liked one I saw that had eyeballs glues to it but thought that was maybe a little to scary for the children around by me...
Armed with ideas and keen to get on I nagged hubby to take me to the craft store and get some supplies..I found a styrofoam ring, black crepe paper and black feathers...I took them home and within an hour I had made this wreath


 Firstly I cut some strips of crepe and wrapped it around the ring. My intention then was to make loads of rolled roses out of the crepe and glue them all over the ring...but my intentions were good but my body was unwilling to let me make loads of roses....black is very hard to continuously work with so after a few roses I got very bored with making them and decided I needed a few bell like flowers instead of just roses so I rolled the crepe very loosly and glued it so that it looked like bells mixed with roses....after making a few I decided to start glueing them onto the ring with some feathers. Once I had got to the stage that it is now I decided that I liked what I saw and finished it there...Not what I originally intended it to look like but one that I am quite happy with...
Thank you for looking
Love debby
I looked around Pinterest and saw so many lovely ideas...I particularly liked one I saw that had eyeballs glues to it but thought that was maybe a little to scary for the children around by me...
Armed with ideas and keen to get on I nagged hubby to take me to the craft store and get some supplies..I found a styrofoam ring, black crepe paper and black feathers...I took them home and within an hour I had made this wreath


Thank you for looking
Love debby
Saturday 6 October 2012
A halloween frame for my daughter
I saw this saying and immediately knew it was just my daughters sense of humour so I made this frame for her....I will give it to her for halloween
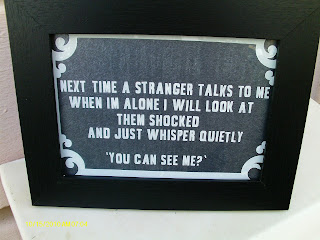 The outer frame that I used was from the sil store, and seemed to go very well with this saying and i was very pleased with how lovely it cut..
The font was one of the Arials, I cant remember which one though as I have 3 different ones on my pc...
The vinyl was easier to weed than it was to get it onto the glass but then I dont intend to really do this frame again and again!
The background card was charcoal grey from the Debbi Moore collection
Thank you for looking
Love debby xx
Coffins and legs
I have been having so much fun making Halloween pieces, I have not been to well and have been housebound for a few days and got very bored so Halloween stuff it was...
I have made spiders bats and ghosts all from files in the sil store and they are now poised in a box ready to frighten the boys and girls around my area....
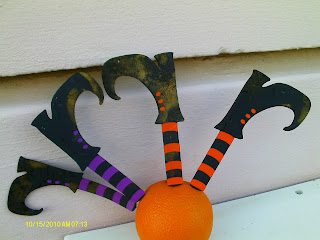
Today I have made 40 Coffins (the same file I used last year) and 16 pairs of witches legs...oh what fun...
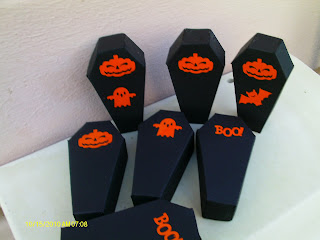
 I decorated the coffins with vinyl pieces I had in my stash!! and the stockings on the witches legs were also done with vinyl from the bit box in my stash!!
I decided the witches boots needed to be dirty and so to give them that muddy look with a gold coloured cosmic shimmer..I glued each leg onto a cocktail stick so that they can be placed into the mud in the front garden Halloween night
thank you for looking
love debby xx
I have made spiders bats and ghosts all from files in the sil store and they are now poised in a box ready to frighten the boys and girls around my area....
Today I have made 40 Coffins (the same file I used last year) and 16 pairs of witches legs...oh what fun...


I decided the witches boots needed to be dirty and so to give them that muddy look with a gold coloured cosmic shimmer..I glued each leg onto a cocktail stick so that they can be placed into the mud in the front garden Halloween night
thank you for looking
love debby xx
Unaware
I saaw a saying whilst looking at halloween fonts and it made me laugh and it inspired me to make this frame with cammie
 Firstly it was hard trying to find fonts that were suitable but I ended up using the font Joan for the main body of writing as I wanted something that was easily readable by children, as I intend sticking this to my front door for Halloween!! The word creeping was done using the font Exquisite Corpse! even the name of it gives me shivers!
I typed the words into sil studio and because I was using vinyl on glass I then turned the whole thing back to front before I cut so that the words are on the inside of the frame....The creeping font was a little troublesome to weed at first but once yu got a hook into it easy as pie...
I used a very nice charcoal coloured card from Debbi Moore stock that I had lying around but in this picture it looks charcoal!!
I know it is a little slanted and that was on purpose (Yea yea) because i dropped a corner onto the glass before I had lined it up properly and it stuck better than you can usually get it to stick so wonky it is....
thank you for looking love debby xx
Sunday 23 September 2012
Competition entry
I decided to enter a few competitions online with cardmaking, for no other reason than to give me something to do...because when you start out with a goal in mind the achievement felt when you finish is such a good thing..
I chose the challenge at http://www.thepapercabana.com/2012/09/the-paper-cabana-challenge-3.html
For this challenge you had to go look at fabric flower jewellery and hair ornaments and take your inspiration from that.....at first the idea I had was something Oriental and floral (afterall you cant forget the flowers in this inspiration!) but having looked at Lotus flowers I decided I didnt like the files out there available and didnt want to do a print and cut of one so I chose to do one of my scalloped flowers and the little family of flowers grew....and so did the idea....and this 3d card was born...
 The wheelbarrow and box came from a template that I bought right back in 2008 from a company called Card Carousel....I new it would come in handy one day!! I cut out the barrow on my cammie in white card then gave it a rub over with my Tim Holz distress ink in walnut stain....
 I wanted the flowers to sit in the barrow but because it had quite deep sides they wouldnt..thats where some green tissue paper came in handy...I screwed it up and pulled it about until it gave a resonable base for the flowers to sit on...To secure the flowers i put them on to foam pads and pressed them onto the tissue paper..I put as many as I dared to into the barrow....All the flowers were made with digipaper from dreemies, and I used 4 different papers...
 I made a little scene in CAP2 for the back of the box just to give it a little interest and placed a fence, a watering can and a hedgehog on there and added a branch which I then glues some paper flowers to...
This was my project completed....


Thank you for looking
Love debby xx
I chose the challenge at http://www.thepapercabana.com/2012/09/the-paper-cabana-challenge-3.html
For this challenge you had to go look at fabric flower jewellery and hair ornaments and take your inspiration from that.....at first the idea I had was something Oriental and floral (afterall you cant forget the flowers in this inspiration!) but having looked at Lotus flowers I decided I didnt like the files out there available and didnt want to do a print and cut of one so I chose to do one of my scalloped flowers and the little family of flowers grew....and so did the idea....and this 3d card was born...


This was my project completed....


Thank you for looking
Love debby xx
Subscribe to:
Posts (Atom)